The Chicken Run was the first of my projects that I got accomplished this spring. Overall, I pleased with the way it came out. Nothing special, just a smaller 10 foot wide by 18 foot long run. The bare dirt gives you the visual of how large it used to be. I made it smaller because I wanted to reclaim the front of my shed yard, and since I let my birds free range on the grass every night and all weekends, I really didn't a run of such a large size for my flock size of 10 birds. I firmly believe that the more access the chickens have to select what they want to eat in the yard, the better my eggs will be. If you haven't seen this blog post, it shows you a store bought egg next to one of my hen's eggs. Have a nice weekend!
Showing posts with label Chickens. Show all posts
Showing posts with label Chickens. Show all posts
Sunday, April 15, 2012
Monday, April 9, 2012
Picking Chicken Breeds
I thought I’d take a minute and respond to the wave of (imaginary) emails I've received about how I select chicken breeds for my backyard flock. Here is a great chart that lists all of the most common chicken breeds and egg colors for each. My advice is to simply vary your egg layer colors so that you can keep track of who is putting out, and who is not. You have to earn your keep around here!
For example, here is what I picked out for my current flock:
1. Cuckoo Marans - dark brown/chocolate
2. Silver Laced Wyandotte - brown
3. Amercauna - blue/blue green
4. Silver Grey Dorking - creamy white
My advice is based purely on egg color and is not considering other factors that may be important to you, such as friendliness and body style. You may need to adjust your formula for selection based on what is most important for your needs. One thing I can say with certainty is that even if you select the wrong breed, it will still taste delicious if you slap that bird on the grill and cover it with Sweet Baby Rays BBQ sauce.
Saturday, April 7, 2012
Pictures from the Archive: My hen hatched chicks
I just found these pics from when my hen "cardboard" hatched some eggs I stuck under her. She didn't even lay them, but set on them for 28 days. I was very proud of her.
Sunday, April 1, 2012
Baby Chicks in the yard
This the first time these chicks have ventured outside of the coop.
 |
| Group shot |
 |
| Group shot |
 |
| Hiding underneath the garden hose |
 |
| See the little white silkie in the back left? |
 |
| This hen always seems to be perched on something |
Sunday, February 26, 2012
A Better Chicken Waterer
It is so surprising that the most commonly bought and sold chicken waterers are so poorly designed. The same can be argued for feeders considering the high percentage of food waste. The common waterers constantly become fouled up with chicken shit within minutes of being in the coop. I noticed this for years but never really thought of a better alternative until one day I saw a poultry nipple setup. After some research, it was pretty clear that this is the superior design for getting birds clean water. I was a bit concerned about them being able to learn to use it after so years of the other, but after phasing the nipple system in, they all picked it up. Chickens are stupid animals, but thirsty stupid animals tend to get smart or die.
My design was too simply put a couple of nipples in the bottom of a 5 gallon bucket, hang it, and problem solved. It was quite the success, they all picked it up right away. I use this setup today. You could also tie this into some kind of a rain collection system for automatic filling, if one where so inclined to do so.
My design was too simply put a couple of nipples in the bottom of a 5 gallon bucket, hang it, and problem solved. It was quite the success, they all picked it up right away. I use this setup today. You could also tie this into some kind of a rain collection system for automatic filling, if one where so inclined to do so.
Saturday, February 25, 2012
Baby Chicks have arrived
Today the chicks have arrived. It was really fun ordering the different breeds, as I've accumulated much more breed knowledge since my last order. I really liked being able to mix up the colors. If my vision is correct, this is going to be a pretty damn awesome group of colors and breeds.
 |
| This bird is super happy |
 |
| All of the little hens |
together
 |
| One little silkie |
 |
| Jackson loves the babies |
 |
| 2 future dinners |
Monday, February 20, 2012
Zero Waste Chicken Feeder
After years of messing around with poorly designed chicken feeders that are prone to waste feed, I've moved to a different home made model, and the results thus far have been terrific, my feeder has zero waste.
I've always suspected that the chicken feeder and waterers companies have mutual agreements between each to keep manufacturing shoddy products that waste feed and promote the purchase of more and more of the other. It's an interesting thought at least to a guy that can't even seem to keep his side burns trimmed straight.
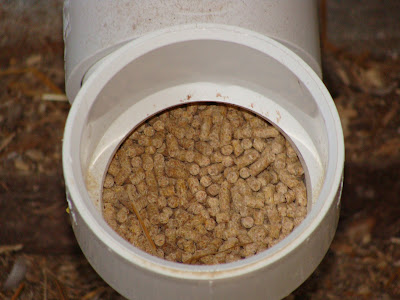
The combination of this feeder and using pellets (instead of crumbles) has resulted in my feed bags lasting 30% longer. This design prevents waste by forcing the chicken to stick it's head back into the feeder 2-3 inches, and any twitches or sudden head tilts that typically send feed flying into the wasteland with a standard feeder is blocked by the walls on the deep feeder, and the feed flies back into the consumption area. With feed prices shooting up, preventing feed waste has become more important to me. Also, it gives me a reason to build something new, and this design is working better than I expected.
The feeder consists of a 3 feet long, 4 inch PVC pipe, a single reducer and 2 45 degree elbows. Stick it all together, it was just around 20 bucks total. The feeder will save me that 20 bucks spent in about the first 3 months of use, so it's a sound investment.
Capacity and food access is probably suited for around 6 birds, and since I typically have about 10 birds, I may build another one. The opening could be a double access with a pair of 45 degree adapaters if someone wanted to open it up a bit.
Wednesday, January 4, 2012
Bird photos from the archive
Wednesday, June 15, 2011
Chicken Coop Composter
My chicken/duck coop is essentially a giant composter, that is how I use it anyway. Each year almost all of my raised beds are filled with soil made in the coop.Here is what I do. During the summer months I use straw bedding in the coop, in the winter I use wood shavings for the extra moisture of the birds being inside the coop more during the colder days. I simple turn the bedding every day or so to keep it breaking down more evenly. Some refer to this method as the "deep litter method" (for googling purposes).The finished product is added to the top of my raised beds each year before winter sets in, and by the time spring comes around and it's been turned a few times, it's top notch soil. I use it for my vegetables, and add any left over bedding into my row of blackberries. I've been tweaking this system for the last 3 years, I believe the soil is very fertile from the broken down chicken and duck shit, I hope to someday have it tested in some manner. The sole problem I have not yet to solve is the heating up of the matter, it never really goes through a full heat like a traditional compost pile, thus allowing seeds to sprout throughout the vegetable season. I plan to solve this problem by going heavy on the beds when I dump the new soil on top, and cover with black plastic with holes for rain to enter throughout the winter months. This should help trap and attract heat to get the compost to a temperature capable of "cooking" new seeds. Like most everything, it's a work in progress that gets incrementally better each year.
Sunday, June 5, 2011
Subscribe to:
Posts (Atom)


.jpg)